Showing posts with label bras. Show all posts

Thursday, December 31, 2015

7th Day Of Christmas - Bras

I had a fabulous time in Hamilton last year learning how to make bras at Boob Camp, and have been approached by a number of people asking if I make custom bras.  Now there is quite a difference between making a bra for yourself that has already been fitted to you personally, and making one for someone else who is a different size/shape to you.  I do find that bras are easy to make, but the fitting worried me somewhat.  So I signed up for another course this September/October - alterations.

Wow - I'm glad that I didn't try and muddle through on my own - there is a lot to learn.  I was in a small class with three other ladies and we were taught by the Fairy Bra Mother herself - Beverly Johnson.  What she doesn't know about bra making is really not worth knowing at all!

It was another great week - although I managed to book myself into the wrong hotel (thought that I had booked the same one as last year, and I paid in advance using Credit Card Miles) unfortunately it was a dive - comfy bed though, so I guess that is something- and I was directed to not one but TWO fabulous fish and chip shops with FRESH fish.  Oh boy, I really was spoilt!  Coming from the UK I really miss fresh fish and chips!

So, after a week of slicing, dicing, pinning, tucking, manhandling etc., etc., I think that I have a fair chance of making bras for other people.  I need to make up some sample bras, and then I will be seeing how serious my buddies were about custom bras!

In the meantime, here is some bra candy for you!  Aren't these combinations lovely?  I really like the cornflower blue and there will be at least one bra made just for me out of that fabric!  All just waiting to be made up into some gorgeous bras!


This is an 'extra-large' photo - how does that work for you?  I usually use medium or large, but wanted to get some detail in this time.  Let me know if it doesn't work or is too big!

Sunday, April 19, 2015

iPad Stand and a Couple of Bras

I love to read other crafty blogs - sewing,  knitting, crochet, quilting etc., and pick up on their ideas.  This morning I read Sotak's blog, and she had a post about making tablet holders.  She herself had seen them on Pinterest, here.  Well, who doesn't need a handy holder for their tablet?  So this is what I made whilst watching an episode of NCIS this morning:


They are made out of a rectangle of fabric, sewn and twisted and stuffed with rice and regular stuffing.


How fab is that?!  They really are very useful so I made one for Mr. SDSC and one for my father.  Oh, and then I decided I need another in my sewing room because it is such a drag to have to carry one from one room to another (I don't have a photo of that one, but it is just as cute!) . . . . they are very quick to make - less that a half hour.  Due to the rice, they are quite stable - I have mine balanced on the arm of my chair right now.  The only change that I made to the instructions, was the same as Sotaks, and I ironed some fusible interfacing to the fabric.  It has a bit of loft to it - 1/16" max, and I iron it onto the little bags that I make.  It made the project feel smooth and soft.


I think that they would work well with other types of tablets/book readers, and maybe even small books.


I also made a couple more partial band bras, but the photos are a little a washed out:


It was pretty straightforward, overlaying some textured, dotty lace on the upper cup and the bridge.  It went together quickly and easily and has already been 'tested'!

I then saw this whilst walking past La Senza yesterday:


What I liked was the plain cup with the lace on the bridge and the sides/back.  So I made one!


I'm really pleased with this.  I used fabric spray to attach the lace to the base fabric - I did this on the pink bra above as well, and it was more successful with that bra - on this one it pealed away, but held enough for me to sew it all together.  The only problem is - I was a little aggressive with the bottom band elastic and it bordering on 'uncomfortably snug'.  I will wear this on my 'skinny' days!  I am going to play with some foam cups next - ones that I make myself and then cover with fabric.  I've been watching some great videos on Make Bra - lots of great ideas!

I also have some more linen, and have some TG garments in mind - I may be swapping out a garment or two from my current TG collections for the Artisan's Square SWAP - I've got over a week left, so loads of time!

How was your sewing this week?

Sunday, April 12, 2015

Back to Basics

I have to say that I had a great time with my TG sewing, and when I finished the pieces that I had in mind, I was at a bit of a loss as to what to sew next.  It is almost like coming down off an adrenalin rush, well not really, but there is definitely some kind feeling of loss.

So, what to sew next?  Well, my 'go to' project when I am feeling a little down, or need to sew but don't have anything planned, it to make something small like a mug-rug, or a pouch.  The thing is, I am planing on attending another bra making course in Hamilton later in the year with the lovely Beverly of Bra Makers Supplies, and I had picked up a half yard of 'bra' quilting fabric.  So I made a pouch!


The lining is made from some Ikea pillowcases - we buy the cheap duvets and covers for our greyhounds to lie on.  When they need laundering it is a lot easier that washing a regular dog bed of the size that would be suitable for greyhounds - they are big dogs! The pillowcases are always unused, but the print worked really well with this pouch as a lining.

Having made a lovely pouch that I will use to hold some sewing notions on my bra-making trip, I thought I'd make a bra.  Just like that!  I recently bought the Craftsy Class, Sewing Bras, Designer Techniques by Beverly Johnson.  This course is a follow on from the basic bra making course, Sewing Bras, Construction and Fit.  There were a couple of details that I was particularly interested in, the first was sewing a bra with a partial band.  In other words, the band does not go under the cups.  Secondly, Beverly shows you how to change the back band to help prevent bra straps falling down.  I have sloping shoulders (I guess we probably all have) and this seemed an ideal opportunity to try it out.

I used my Classic Bra pattern from Beverly's Pin Up line - I have made this many times before and it is very comfortable, and then followed the Craftsy Class to make the necessary alterations.  You could purchase the pattern complete, without have to made the changes, and it is called the Linda Bra.  However, the pattern is $20 plus P&P, and the Craftsy course is currently on sale for $24.99, so it makes sense to get the course if you already have a fitted Classic Bra pattern.  The construction is pretty straightforward, although there were a few changes in comparison to the Classic Bra, but it went together well:


I will wear this tomorrow and give it a good 'try out'!  It seems a little too big around my rib cage so I have trimmed 1/2" of the back band on the pattern.  I will need to wear this bra on the middle hook and eye setting, so I think it will be OK.  I also noted that the bridge does not sit flat on my chest, so I'll have to look into that.  It is not out by much, so a small adjustment is probably all that is needed.  Other than that, all seems good.  I like the feel of there being no band under the cups, so once I have these two little issues sorted out, I will start making some fancy smanchy versions!  As I have made the back band higher to help prevent the strap slippage, there is not much space for strap adjustment.  I used the elastic that comes with one of Beverly's findings kits, but that only gives you a maximum of 10" per strap.  I will either have to buy it by the metre in future, or see if she would add 2-3" more in a pack.  I think that would do the job!

Again, I can't recommend Beverly's patterns and classes enough - I think that they are great!

So, that was my weekend sewing - how was yours?

Wednesday, March 11, 2015

TG - 1, 2, 3

So far, so good - I've made three pieces for my Lagenlook/Tina Givens SWAP.  And I am really please with how the pieces have turned out so far.  Unfortunately I've not had chance to model the pieces myself - so 'hangar shots' will have to suffice.

OK, here we go!  First of all we have Jaqueline, and this is the photo from the website:


All these garments are from woven fabric, and I have made a pair of the trousers and two of the slips.  The first was in a white rayon and drapes beautifully.  Gosh, my photos look rather drab in comparison - I will need to learn to photograph like she does!


As you can see - pretty plain, nothing really to report.  I used my serger to complete a rolled hem and bound the neckline and armholes.  Those armholes are HUGE!  It is a good job that I will be layering this top as it verges on the indecent as far as the armholes are concerned!  I had to add two little darts to take in some of the excess fabric around the armhole - you can probably just see one in the photo above.


I sewed a small linen bias square on the centre back which will fray when washed - a little bit of whimsy!  And if I don't like it . . . . I'll just unpick it!

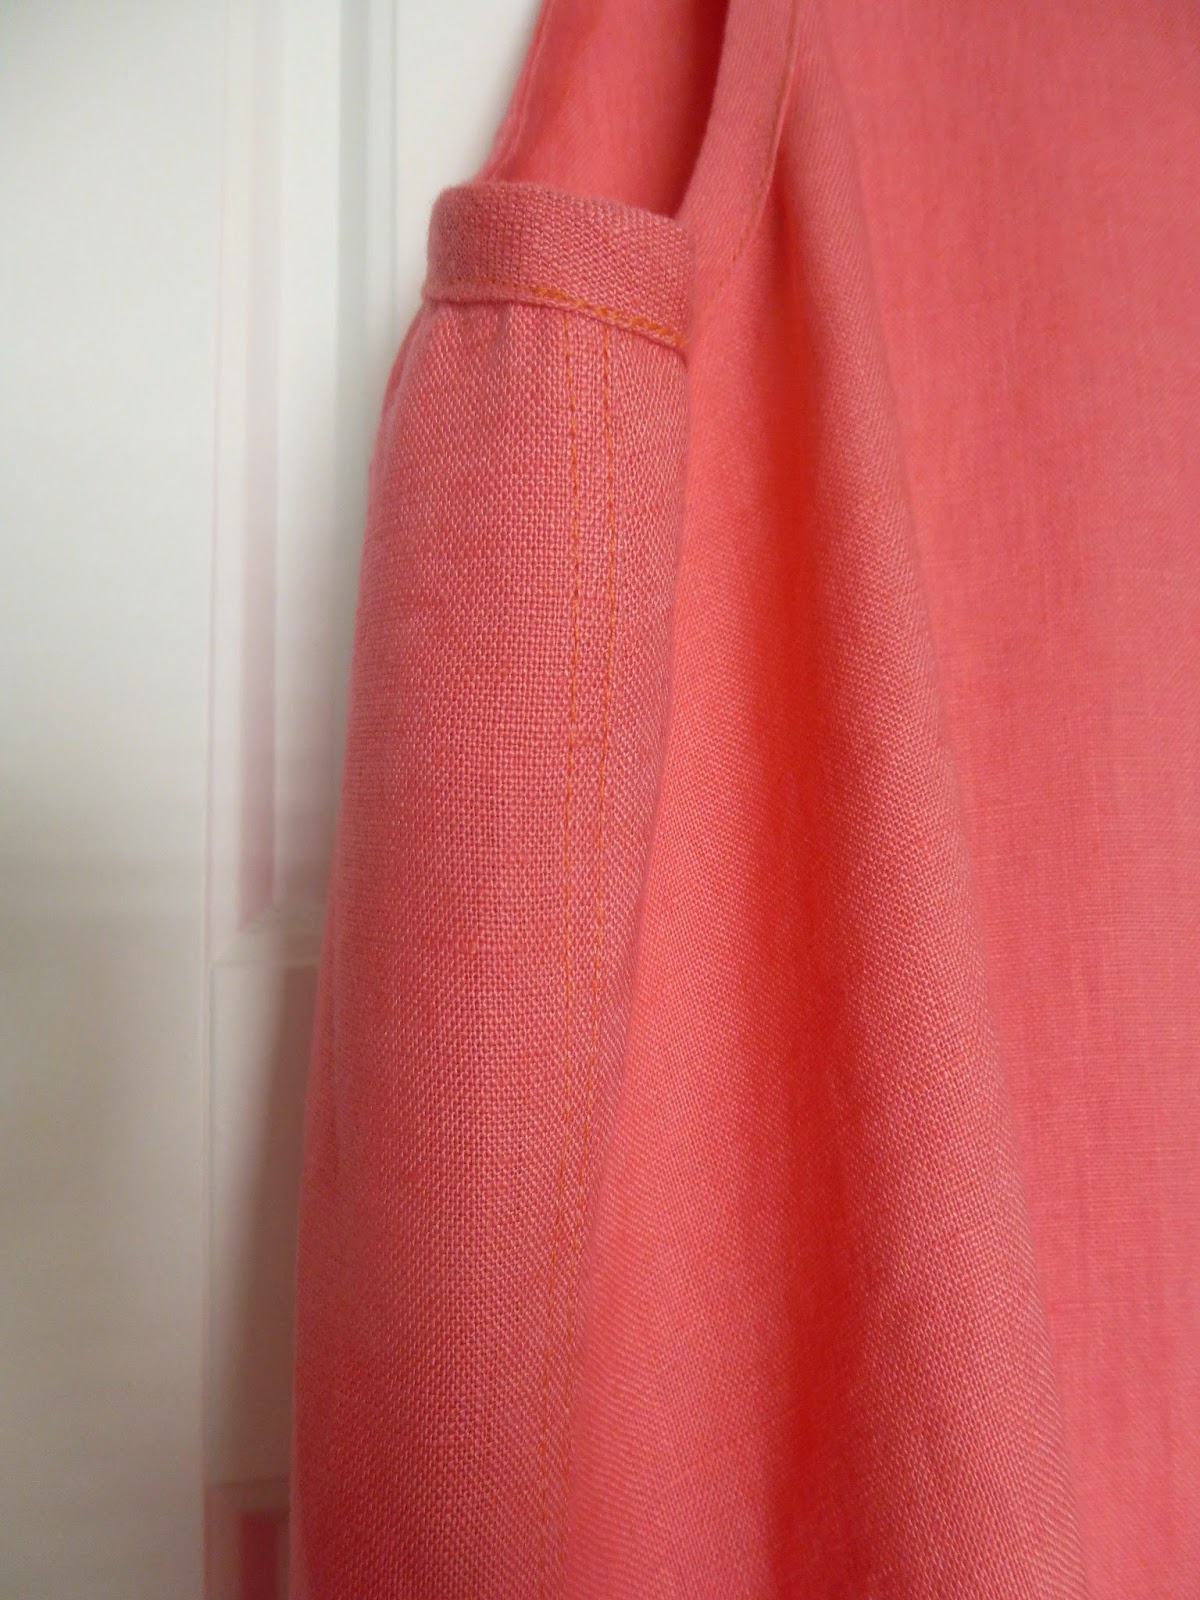
I then made another slip - after all, when I have been known to make just one iteration of a pattern?!  This time I used a gorgeous coral coloured linen.  I made a number of changes to the armhole and neckline (no armhole darts this time!) - I actually used my Sorbetto pattern which I had fitted many moons ago.  I did not include the bust dart or the centre pleat, and the fit is fabulous.  Really!


I have quite sloped shoulders, and as all the best sewing/fitting teachers will tell you - get the shoulders right and everything else will fall in place.  Well mostly.  But you get my drift!

And lastly - some trousers.  Ms. Givens appears to favour dropped crotch trousers, and I am not quite ready to embrace that as yet, so I used my TNT trousers pattern.  That dealt with the waist/crotch and I used the Jaqueline leg pattern for the pleats, binding etc.  I did shorten them a few inches so that they sit mid calf, rather than the designer ankle length, but will probably make a longer pair next time.  I used some tan ramie for these, and I am pleased with these as well.


I know, I know, hanger shots are not that inspiring, but I wanted to have a complete 'outfit' before taking 'person' shots, but also wanted to record my progress!  Next up with be the cropped top which is likely going to be based upon the jersey cardis that I have been making recently - Simplicity 2154.  I will shorten the top and then add a frill/peplum to get the 'feel' of the TG pattern.

I have to say that I am loving these garments.  They are pretty quick and easy to make, they fit well (when I sandwich them with my TNT's for shoulders, crotch curves etc) and the fabrics are gorgeous.

The next pattern on my list is the Phoebe:


Closely followed by the Peplone:


And the Briare, which incidentally is a freebee pattern!


I am having to be very careful with fabrics - I don't want to look like someone from Little House on the Prairie, so I have a lot of plain fabrics planned so far, and have swapped out a couple of the patterned fabrics I had as I think that they will look a bit too cutesy . . . . but that means I can use some of my more brighter and bolder fabrics.  Watch this space!

A word or two on these patterns, there is not much in the way of line art.  if you are interested, it is worth downloading the instructions (from the website, and free of charge) to get an idea of pattern pieces and style lines.  I think that they are are great starting point if you have some TNT's that will assist you with fit, like I have done.

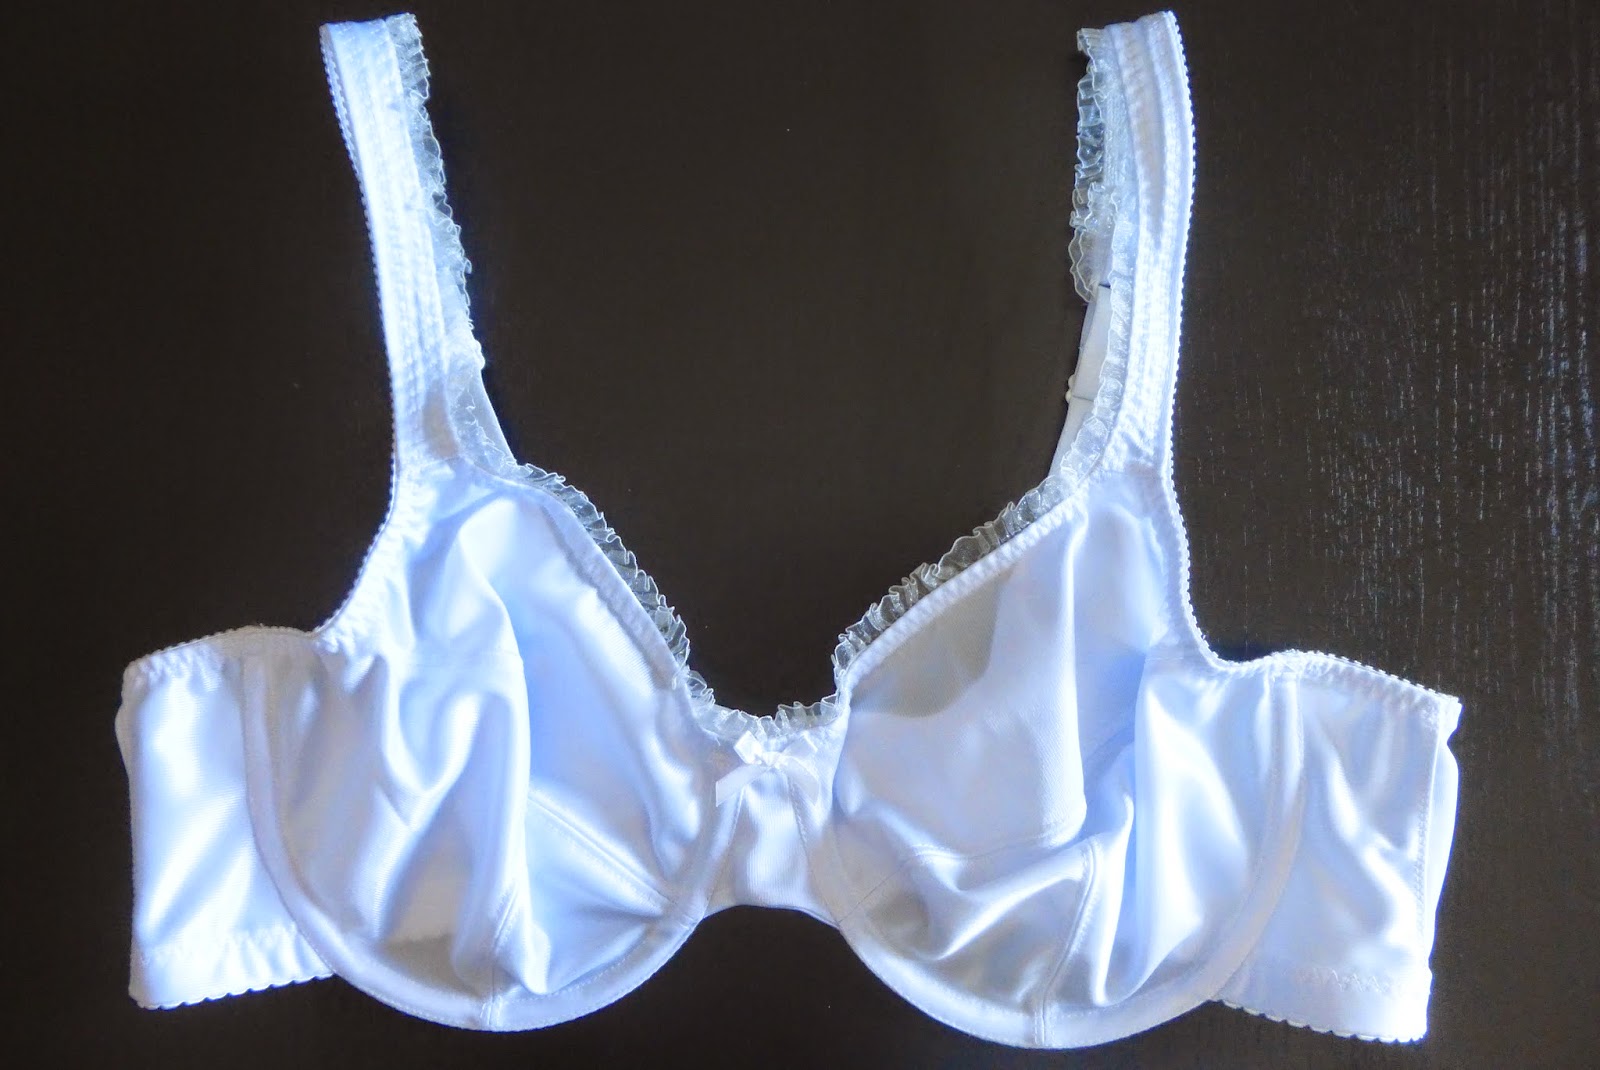
Finally, I was pleased to see that Beverly Johnson, the Fairy Bra Mother, has a new Craftsy class - Sewing Bras Designer Techniques.  I managed to pick up my class for half price, and will be making some designer bras over the next few weeks.  Details to follow!

I think that I am getting a handle on my Spring sewing, and the SWAP - are you sewing into the new season?

Sunday, November 23, 2014

Bras & Bags

So. Winter has arrived in these parts, and that means lots of indoors activities . . . and sewing! And knitting! Hurrah. First, let me show you the weather evidence:


Very pretty, that's for sure!

I thought hat it was time to make some more undies, and two more bras have made their was into my lingerie drawer.  Who doesn't need a new white bra?  This was made using the Shelley pattern from Bra-Makers Supplies in Hamilton, Ontario.  With the exception of the lace, all the fabrics and notions were also from Bra-Makers Supplies.  The lace was already in my stash, and actually started off as a gathered lace.  I took off the band that gathered the lace, gave it a good pressing - and voila - some fabulous flat lace for my new bra!


Next up was a racy, red one.  Again, all supplies as above.


I also made a couple more box bags for my sock knitting.  And yes I have that many pairs of socks on the go!


The bag above is a bit more peachy in colour, and looks so delicate.


And who can resist the sausage dogs?  The lovely dotty lining matches perfectly and I am very pleased with these. . . . and I have some socks to share with you next time as well! 

How about you - do you have 'cold weather' projects that you are working on - or 'hot weather' projects for my Southern Hemisphere buddies?!

Tuesday, August 5, 2014

So, You Want to Make Bras?

Oh boy - I've been wanting to share this with you . . . . and now I can! The Fairy Bra Mother herself has been approached by Craftsy and has just returned from filming a bra making course.  Woooohoooo!

Craftsy Home Page

She has written about the upcoming course here and here.  So, although Beverly cannot release any further details (and I don't know anything else either) there will be a course later this year.

 Bra Makers Supply Home Page

I am so excited about this news.  I don't know any class details, but I am guessing that you will be to learn all the tricks and secrets that I learned on my course in Hamilton - this is such a fabulous opportunity.  As soon as I hear anything else, I will make sure I post it!

If you have never heard of Craftsy - follow this link and take a look around.  I have subscribed to a number of courses - Sewing the Couture Dress, Plus Sized Sewing, Garment Industry Secrets etc., etc., as well as some quilting and jewellery making classes.  It is a crafting person's heaven!!

Monday, August 4, 2014

Another Weekend = More Bras!!!

Hey, step aside and let the addict have her fix!  Things are a little trying right now (we are having a deck built in the garden and that is causing us a little stress) - so I have retreated to my happy place to make pretty things - always a 'cheer me up'!!

Also, it turns out that the lovely lacey pink bra that I showed you last week . . . . .


Is somewhat uncomfortable to wear :(


That 'oh so pretty' gathered netting trim on the strap, runs along the armhole - and scratches like an 'I-don't-know-what'. Grr.  What a nightmare.  What is to be done?  I know, make a similar one with the trim where it should be - on the neckline!

So this is version two - I used the 'Classic Bra' pattern this time which used trim across the top of the cups, and some leftover netted lace from my moulded cup bra:


No more scratchiness!!

And then I made a couple of others.  I have been wanting to make a chocolate coloured bra for ages, well, at least since my course!  I paired up the fabric with some lovely coffee coloured lace that actually looks nude when I wear it:


And then I wanted to use up the leftover lace from my first turquoise bra.  Here is the original - using the finished edge of the lace to form the wings of the butterfly:


And on this bra the finished edge is on the top edge of the cups.


This means that when buying lace which is 5"/6" wide - there is a lot of leftover lace . . . . . so this is what I made!


I saved just a little lace with an edge attached to trim the bridge - I think it looks pretty good!

So there we have it - another three pretties to add to my collection . . . but still no knickers.  I really must concentrate on knickers!  And I will.  I promise!

How about you - are you easily sidetracked by projects that are quick and you know will turn out well, despite knowing you should be making something else??