Showing posts with label trousers. Show all posts

Sunday, March 27, 2016

Sweet Violet - with a Side of Oprah

The new Tina Givens patterns are gorgeous and with some new shaped pants and a 1920's styled tunic, they had my name all over them!  The patterns released released with 'money off', so Violet and Oprah made their way to me via the intertubes.  They are pdfs, and I have to say that unlike a lot of other, I rather enjoy the process of taping paper together, tracing off the pattern parts . . . . call me crazy (CRAZY!!)


This is the Violet tunic made from leftover linen/rayon fabrics.  These fabrics are from last summer's makes!  I didn't have enough of any of the colours for the binding so used some leftover patterned fabric.  And I love it!  I made this pretty much straight from the pattern - I made the largest size and my one alteration was to piece the front gathered skirt.  The original pattern has the front sides and gathered skirt (seen here in white) as being one piece.  I just knew that I'd have an issue attaching the front panel (in blue) to the one piece sides and skirt (all that clipping into corners, not my idea of fun!), so I just cut the fronts all the way down to the hem and cut the gathered piece separately.  I was then able to sew the blue panel to the white gathered skirt, then sew the two side panels on to the centre panel - I don't think you can see the difference, and if you can, it really doesn't matter!

The natural coloured trim are bias cut gathered strips - so no finishing required there and the back is solid natural.


Naturally there are pockets.  Most useful!  I bound the neckline, arms and bottom of the tunic with bias cut strips, 1 1/2" wide, folded in half and attached with a three step zigzag.  It gives a lovely 'finished finish' if you know what I mean!


It's rather boring on the back - then what would you expect with beige?!  I did attach a scrap of fabric (same fabric as the bias binding) to the back, and on the inside in the exact same place is another scrap with my label on.


It looks a little wonky, but it is a 6"x3" rectangle.  Honest!  I didn't add the gathering on the back as the guidelines are right were I have my rounded upper back and that would have looked awful.  I am happy with it being plain.

This is a little shorter than I thought it would be be - it is certainly a tunic rather than a dress.  I did lose a couple of inches in length due to my seam allowances on the blue panel - I must have used deeper ones than the pattern suggested, but I have adjusted my pattern and my next version will be that little bit longer.  (of course there is another version already cut out and partially made . . . . !)

I am really pleased that I made this up - I wanted to try the dropped/extended shoulder and I am pleased with the look on my 'not a stick insect' figure.  I will likely try some of the other TG tunics with cut on sleeves.

The jeans are the the Oprah pants. cut from a lightweight denim with 3% spandex.  I cut the medium size but extended the crotch curve to the largest size so that the legs were wider for my chunky pins!!  I made regular in-seam pockets using the Jacqueline pocket (I used that on the Violet tunic as well) and finished off the crotch seam and inside leg seam with top and edge stitching in regular thread that is the same amber colour as regular jeans top stitching.


Yep, the crotch is dropped (and it is quite 'pouchy' and the front) - and that may not be your thing, but who can tell under tunics?  They certainly are comfy!


Oh yes, well spotted - that is Noddy fabric inside the pockets!!  And why not?


The fabric looks more grey here . . . . I think that the picture is a bit over exposed.  For the hem, I serged the edge, pressed that to the right side and then folded up and inch (to the right side) and edge stitched the hem down with the same amber coloured thread that I used for the edge and top stitching.


And of course I had to add a label - especially as the front and back pieces are the same.  The brown fabric is Kraft-Tex and is also known as 'vegan leather'.  It is the same fabric used by Levi's and other jeans makers after they stopped using leather on the back of their designs.  I sewed it to the right side of my right butt cheek - no-one can see, but I know it is there!

And here is my 'Merchant and Mills' inspired photo!


Talking of Merchant and Mills, I ordered the book from Amazon after seeing the gorgeous garments that the lovely Ruth had made and featured on her blog, Core Couture.  It was supposed to be a Christmas present to myself, but will finally be here in a couple of weeks.  I know that there was a later publishing date here in Canada, but still! 

I picked up the shoes from my local outdoor shop, Mountain Equipment Co-op, reduced from a stupidly high number to $39 on the label, and just $19 at the till!  Woohoo!  They are canvas and have rugged sole - yet are as light as a feather.

So here we go - my first Spring outfit.  As the tunic is made out of leftovers from last year, it will go with lots of the cropped pants that I made, and of course the jeans will work with the slips and jackets that I have in my closet - lots of combinations waiting to be worn!

How is your Spring sewing coming along?

Tuesday, April 7, 2015

Out of Alberta - Part Deux

I have to say that I love long weekends - and I managed to make this Easter weekend a five day sewfest.  And where to begin?  To start with, I picked up some lovely linen/viscose blend (Azalia Natural Prints and Solids) from my local fabric shop (Fabricland).


You can just about tell from the photos that the fabric has a lovely linen texture, but doesn't crease quite so much.  It also is a great weight and drapes beautifully.  I wanted to add some more colour to my Tina Givens Collection, and thought that these would go well with the mostly neutral pallette that I have so far.

And this is what I made:


Let me talk you through these goodies.  From the left is a white Zelda dress, the Peplone jacket from before - but now with buttons (!), two pairs of Jaqueline trousers, one pair floral and the other from the same fabric as the Peplone, a green Kika top (minus the frills) and a fushia Jacqueline slip.

Here are all the garments so far:


The very first white slip that I made, from rayon, is not included here - I plan on making a better fitting slip out of white cotton - the same fabric as I used for the longer skirt on the pink and white dress.

Now some photos and details!


White Kika dress made from the linen/viscose fabric.  The top is based on my 'Sorbetto' top and and I added the pleat and some pretty buttons.  I am wearing it here with another pair of Jacqueline trousers made from the same fabric as the Peplone jacket.


Green Zelda slip - without a frill!  Again with the same traousers as above.


Pink Jaqueline slip.


Peplone jacket from my last post worn with some floral Jaqueline trousers.


And with the fushia slip . . . .


And the green Kika.


I then thought that the Peplone and matching trousers would make a great TG suit, so I paired them with a green Sorbetto that I made a couple of years ago - looks pretty good I think/  And then my camera battery ran out!!

I have loads more to write about - close ups, comments on the patterns as well as playing around with 'looks' using these garments, but it is getting late and I need to go to work tomorrow (something to do with earning the money to pay for the fabric . . . . !)

Tuesday, October 14, 2014

McCalls 6361 - More Details

Thanks for the lovely comments on my last post about my trousers - and the weight loss!  Much appreciated. 

I have trialled a couple of pairs now, and have made a decision.  Basically, I am a rectangle in shape with little difference between my waist and hips.  I therefore do not have much gathering going on if I put elastic in a waist.  I also tend to wear cardigans or sweaters that cover my waist area rather than tucking in a shirt or top.  Therefore I plan to use fabric with a bit of stretch/lycra to make the fitted trousers (waistband, zip, fly etc), and woven fabrics to make the slightly looser fitting trousers with an elasticated waist.  I would probably do some top stitching to show a faux fly on the elasticated versions as well as adding some pockets.  Hmmmm.  Lots of food for thought!

Moving on . . . . . whilst I don't want to bore you too much, but there were a few changes that I made to the trousers pattern that may be of interest to you . . . .

Firstly, I extended the pockets so that they would be caught in the fly seams, thereby creating a 'powerband' that helps to keep the front of the pants stable.  The photo below shows a standard front pocket bag on the right, and my enlarged (I like big pockets!) and extended front pocket bag on the left.  The other part of the pocket bag does not need to be extended, just this part that forms part of the front of the trousers and is caught in the side seams.


 Secondly, because the zipper is placed as far over as it can be behind the fly, I didn't need to match the zipper tape to the fabric . . . which was just as well as only had bright coloured zips in my stash!


The above two photos also highlight the two different waistband treatments that I tried out.  For the grey trousers I attached the waistband and threaded through some 1" elastic as per Pants for Real People by Palmer/Pletsch.  When I am wearing the trousers you cannot see that there is any elastic there - they just fit a bit nicer around my waist.  The black pair have just a straight waistband with some interfacing.  I will see which ones are the most comfortable, and use that in the future. Oh, and can you see the lovely poppy fabric that I used for the pockets?  I think that may become my signature - lovely fabrics for the pockets.  Another great way to use up the cute fat quarters that I keep finding . . . .


Finally, I did try button holes, but got a little impatient - all that measuring, sewing, blah, blah, blah, so I used some cute snaps that I have about 300 of!  They are from a company called Babyville and were designed for baby clothes and nappies.  I have used them before when making wallets, and I love them.  They are plastic, come in lots of colours (except black!) and are fixed with a dandy instrument that looks a bit like a hand-held hole punch.  As long as your waistband is not too thick, they snap on really well and are very strong.  I have tried the more traditional snaps that hammer on, but I have never found them to be very effective - I find it hard to get them straight and matching, and if you hammer too hard the snaps actually cut through the fabric.  So, Babyville snaps it is for me for now.  I have no intention of flashing my waistband - I usually wear a top over my waistband, so no-one else know but myself!


I forgot to mention in my last post that finally, now that winter is almost upon us, we have a deck and railings and I can take photos outside.  I though it would be fun to share a quick photo of the set up - my camera precariously balanced on an iron table and my two helpers checking things out!


Thanks boys you were great!

Monday, October 13, 2014

McCalls 6361 - It's all Pants!

Having taken the Ron Collins class on pants/flies, I knew that I had to make up a pair as soon as possible and practice what I had learned.  With my local (only) fabric shop having a sale on McCalls patterns, I picked up a copy of 6361 - a basic ladies trousers pattern with a fly front.  Following advice from Threads Magazine about trouser fitting, I used size 18 (my hip measurement) and adjusted the crotch to match my TNT pattern that I have been using over the last year or so.  Having lost weight, I am finding that my 'me-made' clothes are not fitting very well, so I need to update my TNT's.


I made up a muslin that fitted OK-ish, and with a couple of minor alterations, I made up these bright red corduroy trousers.  The fabric was a 'hmm, that doesn't look like the colour on the website' when I ordered it a year or two ago, and it has sat festering in my stash ever since.  There is some lycra/spandex in it that gives it just the right amount of stretch.


I know, red is such a hard colour to photograph . . . . .   I can now see from these pics that I may need to make a slight adjustment in the small of my back as there is some puckering - a sway back adjustment perhaps?

I traced off the size 18 and then used my TNT crotch curves from previous trousers.  All in all, I pretty happy with these.

I then made three pairs of work pants - but in order to photograph them in daylight I didn't hem them, so please turn a blind eye to the bottoms.  I lost three inches to hemming!


C'mon, focus - take your eyes away from the hems and look at the rest of the trousers!!


As you can see - there is the same problem in the small of my back.  I'm actually wondering if I should let out the side dea,s a little.  I will need to check my fitting book.

And here are the last two pairs.  This fabric is a narrow pinstripe:


And finally in a soft mid grey fabric that I am now having second thoughts about.


I will take some more photos now that they have been hemmed - but that may not be for a few days, and I will be wearing the trousers to work before then.  I am mostly pleased with them - on the plus side I am thrilled that I have mastered the fly zips and pockets, but on the minus side I think that the legs are on the loose side, and the fit is a little snug around my hips.  I will wear them and see.  As I am still loosing weight, they will get looser over the next few weeks so it will be interesting to see how the fit changes.  I think that I may also try Style Arc Barb - although they are pull-ons, they are more tight fitting and I have a couple of other corduroys with lycra that I can use.  I can always add a zip if needed.

I will write a follow up post talking about the pockets, zips and closures as well as the waistband treatment - this post is getting rather long now!

All in all this is a great pattern - after a few adjustments, and I think I will make the skirt next as I am now hooked on fly zips!  I find these are quite labour intensive - probably about 3-4 hours each pair, but I think that the finished trousers look quite professional, and I do need to have quite a few pairs for work during the winter - all my lovely lined, pull-on trousers from last winter are too large :(

You can find my review of this pattern here.

Have you tried adding flied to your trousers or are you a die hard pull-on fan?

Tuesday, September 30, 2014

No Flies on Me!

But there will be pretty soon!  I was lucky enough this weekend to take a class with Ron Collins, the fabulously talented and patient Canadian designer, at Creative Stitches in Calgary.  This show was held at Spruce Meadows, a fabulous equestrian centre that is world renowned.  This meant that the hall was very large and spacious, but with a faint smell of manure :)


As with most sewing shows that I have been to in the UK and here in Canada, quilting is such a big component, that I worry about the viability of fashion sewing/dressmaking.  I'm so glad to see it represented in blogland.  Having said that, I did take a lot of photos of some gorgeous quilts and booths - as well as the fabric that I bought, but more about that in another post!


So without further ado - here is my little baby patiently waiting to sew . . .


The class was great.  If you don't know Ron Collins, he works a lot with Sandra Betzina.  He is very patient and knowledgeable and completely understands the 'self taught' sewing brigade, as he is one of us!


Photo courtesy of Power Sewing.

We were taught to incorporate the fly into the front pattern pieces:


Sorry about the crummy photos but the lighting was not very good.


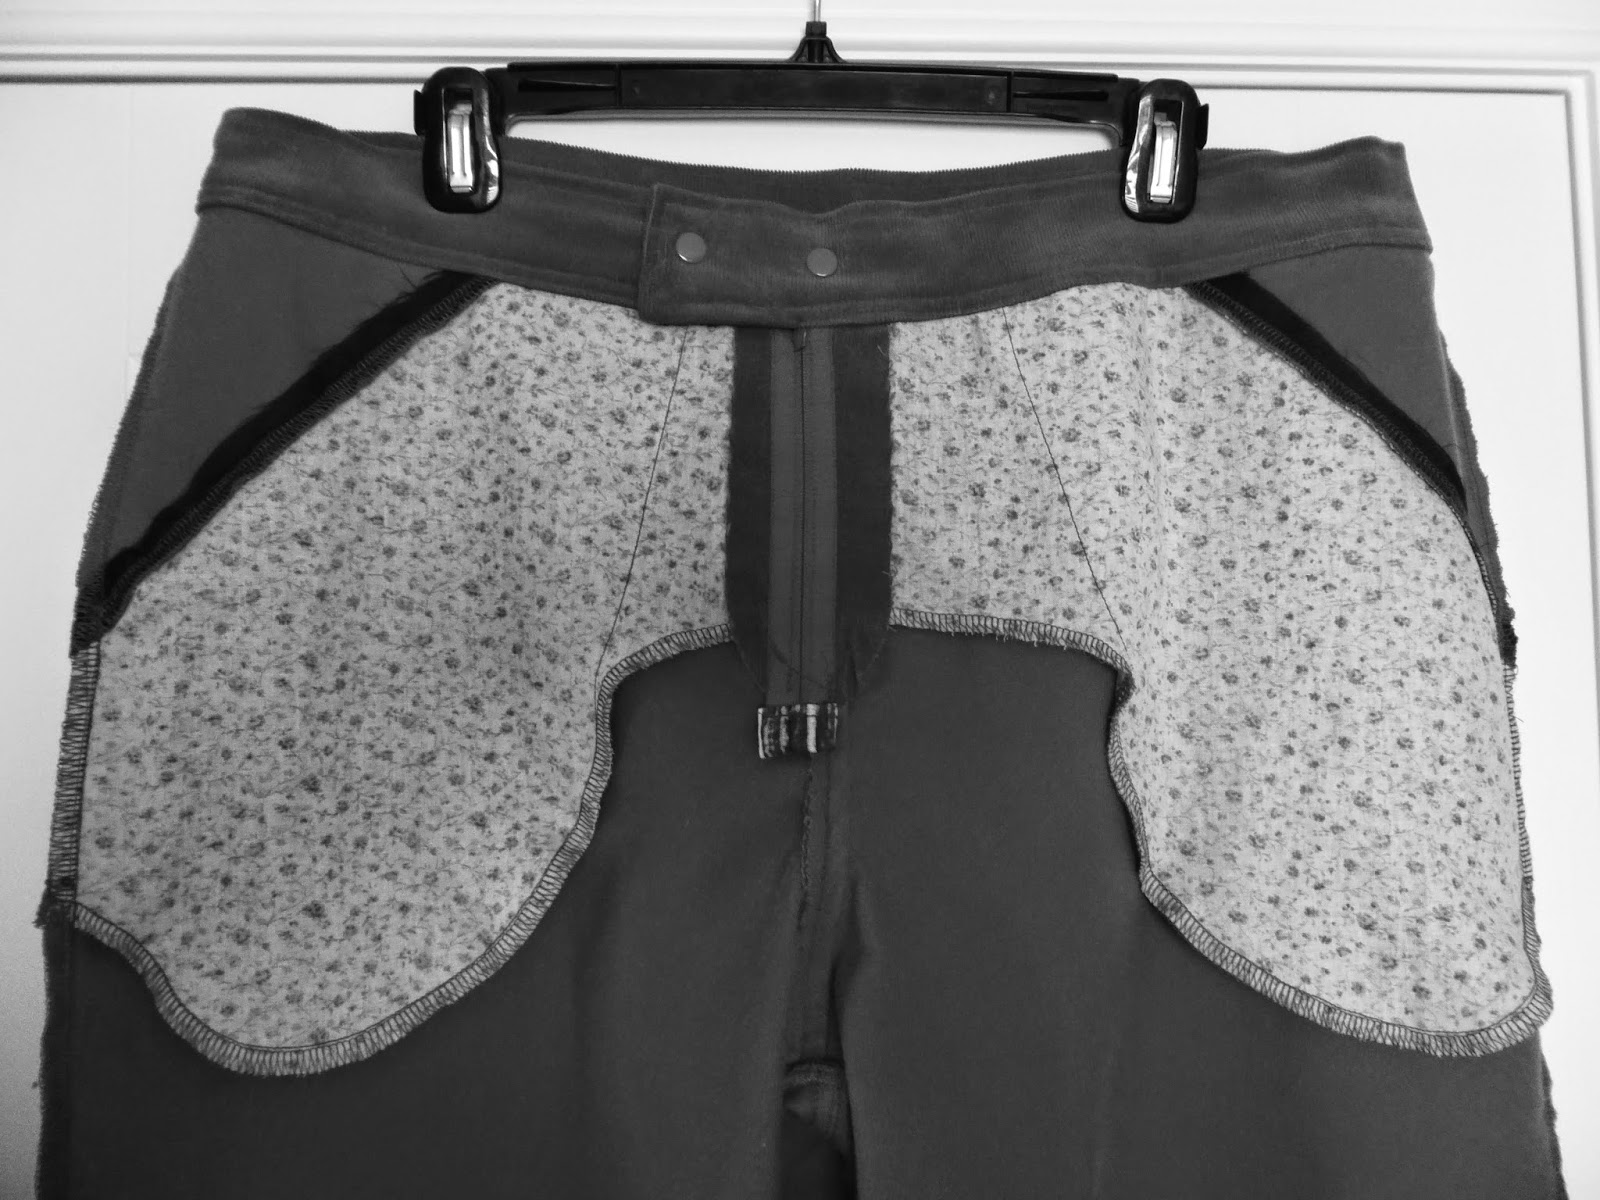
We were also shown how to extend the front pockets towards the fly and that acts as a 'powerband' to hold the front flat.  It would be particularly good if you had pleated trousers as there would be no strain on the outer fabric with the pleats, it would all be on the inner pocket fabrics.  As you can see I used green thread so that I cold see what I was doing! 


I know, it looks a bit of a mess, but it really was quick and easy to put together.  And the final result . . .


I'm really rather please with this.  In a way this class was a little like the bra making course - a mystery was de-mystified and I know feel equipped to attack 'proper' trousers!!  Oh, and I did two different types of pocket top-stitching, and yes some of the stitching was a big wonky!


And the wrong side,  A bit messy, but you get the picture!

Unfortunately there was one downside to this class - I managed to lose a foot for my machine.  What a nuisance.  Fortunately it was the 1/4" quilting foot so it was easy to replace, but grrrrrr!

I'm so pleased that I took this class - trousers with fly fronts have been something that I have previously avoided, purely because I did not know how to sew them up.  Watch this space!

How about you - have you learned any new skills or techniques recently?